Quantcast
Channel: SolidNetWork License Manager – The Javelin Blog
Viewing all 58 articles
Browse latest View live

Changing 2010 SolidNetwork License Manager Default Timeout Period

$
0
0

Timeout

The SolidNetwork License Manager has a default timeout period of 2hrs where any idle license will be returned to the pool.  You are able to shorten this period anywhere between 15 minutes and the 2 hour maximum.  This can be setup by creating an options file.

  • Create a new text file in Notepad or Wordpad and name it sw_d.opt.  Place this file in the same directory as sw_d.lic (the license file) on the server.  The license file should be located in C:\Program Files\SolidWorks Corp\SolidNetWork License Manager\licenses.
  • In the sw_d.opt file, add a line TIMEOUT “feature” “time in seconds” (i.e. TIMEOUT solidworks 3600).  A list of feature names is provided at the bottom of this post.  If you want all programs and add-ins to time out, use TIMEOUTALL “time in seconds” (i.e. TIMEOUTALL 3600)
SNL Options File

SNL Options File

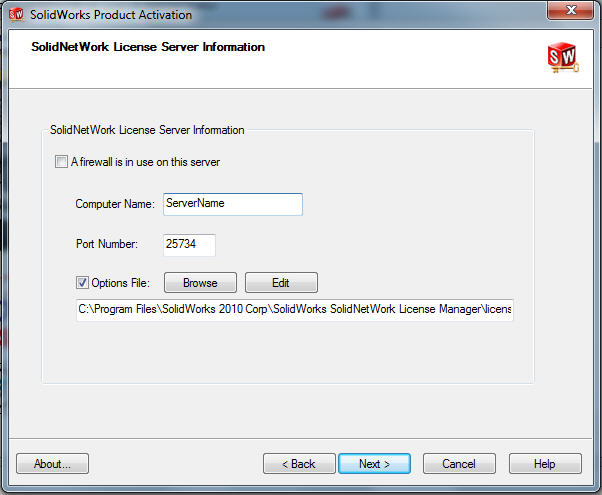
  • If you are setting up your SolidNetwork License Manager for the first time, when activating select the checkbox for the Options file and browse to the location of the sw_d.opt options file.
Options File when Activating

Options File when Activating

  • If you have already activated your License Manager, you will need to manually add the path in the license file.  Open sw_d.lic in a program like Notepad or Wordpad.  Change the second line to point to your options file:

VENDOR SW_D \ options=”C:\Program Files\SolidWorks Corp\SolidWorks SolidNetWork License Manager\licenses\sw_d.opt

License file with Options file path

License file with Options file path

  • Stop and restart the SNL service.  Verify that the options file has been read in by selecting View Log in the Server Administration tab.  There should be a line saying “Using options file: C:\Program Files\…”
SNL Log

SNL Log

More information regarding the Options file can be found in the FLEXlm User’s Guide, which is located in the C:\Program Files\SolidWorks Corp\SolidNetWork License Manager\docs\flexuser.

LIST OF PRODUCT FEATURE NAMES USED IN 2010 OPTIONS FILE

Product - SNL Option keyword

SolidWorks 2D Editor/DWGEditor – dwgeditor
SolidWorks Standard – solidworks
SolidWorks Office – swoffice
SolidWorks Professional – swofficepro
SolidWorks Premium – swofficepremium

Workgroup PDM (SolidWorks Add-in) – pdmworks
Workgroup PDM Contributor (SolidWorks Explorer) – pdmworks_sa
Workgroup PDM Viewer – pdmworks_as

SolidWorks Premium with Simulation Premium – swofficepremium_cwadvpro
SolidWorks Premium with Simulation Professional – swofficepremium_cwpro

SolidWorks Motion – cae_cosmosmotion
SolidWorks Simulation – cae_cwdesigner
SolidWorks Simulation Professional – cae_cwpro
SolidWorks Simulation Premium – cae_cwadvpro

SolidWorks Flow Simulation Standard – cae_cosmosfloworksstd
SolidWorks Flow Simulation – cae_cosmosfloworkspe

SolidWOrks Edrawings Professional – edrw
Scan to 3D – scanto3d
SolidWorks Routing – piping
PhotoWorks/PhotoView 360 – photoworks
FeatureWorks – featureworks
Toolbox – toolbox
3D Instant Website – 3diws
SolidWorks Utilities – utilities
Task Scheduler – taskscheduler
Design Checker – designchecker
TolAnalyst – tolanalyst
CircuitWorks – circuitworks


Reserve Licenses on 2010 SolidNetwork License Manager for Users or Groups

$
0
0

You are able to reserve specific licenses for selected users or groups of users so the license is always available to them.  Any licenses reserved for a user or group are dedicated to them and not available to any other user even if the license is not in use.

This can be accomplished using an Options file that is read-in to the SNL license file.  For information on creating an Options file, please refer to the tech tip “Changing 2010 SolidNetwork License Manager Default Timeout Period” that was posted on August 10, 2010.

Once you have the sw_d.opt Options file created, add the following lines to create groups and reserve licenses:

DEFINE THE GROUP:
Define the different groups of users to control. Write a new definition on a separate line for each group. The definition of a group includes:
GROUP <Group_Name> <user> <user> . . .   (do not include <> or . . . )

  • GROUP is the FlexLM syntax to define a group
  • Group_Name is the name to use to reference the group
  • User is username. The number of user entries depends on how many users are in the group.

RESERVE THE LICENSES:
Set the number of licenses desired to reserve. Again, create a new reserve line for each group. The definition of a reserve line includes:
RESERVE <Number_reserved> <feature> GROUP <Group_Name>  (do not include <>)

  • RESERVE is the FlexLM syntax to define a reservation
  • Number_Reserved is the number of licenses to reserve for a group
  • Feature is the type of license to reserve, e.g. SolidWorks Office Premium (a list of features can be found at the Aug 10 tech tip)

EXAMPLE:
Company X wants to reserve 1 license of SolidWorks Premium for group1 (consisting of user1, user2, and user3) and 1 license for group2 (consisting of user3 and user4). The Options file should look like this:

GROUP group1 user1 user2 user3
GROUP group2 user4 user5
RESERVE 1 swofficepremium GROUP group1
RESERVE 1 swofficepremium GROUP group2

—————————————————————————————————————————————————————————-

**If you want to reserve a license specifically for one user, use the format:
RESERVE <Number_reserved> <feature> USER <user>  (do not include <>)

Further information about Options files using the Group and Reserve keywords can be found in the FLEXlm User’s Guide located in C:\Program Files\SolidWorks Corp\SolidNetWork License Manager\docs\flexuser.  Browse to Chapter 13 on page 115.

IMPORTANT TIP – SolidWorks SNL: How to avoid downtime when upgrading!

$
0
0

If you have a SoildWorks network installation your SolidWorks SolidNetwork License (SNL) server may be installed on a computer in a server room somewhere, it may seem simpler to use an RDP (remote) connection when you need to make changes or upgrade your SNL server to the latest version, rather than having to work from the actual computer, especially if the server is far away or hard to access.  However it is very important to never use an RDP connection when working with the SNL server, but instead to always make any upgrades or activations from the actual machine where the SNL server is installed.

Trying to activate the SNL server via remote desktop will change the Computer ID information sent to SolidWorks during the activation process.  The Computer ID is a unique code that the SNL server generates when it is installed.  When you tell the installation to activate that code is sent to the SolidWorks Activation Centre for authorization.  Only one computer at a time can be activated for a network serial number so if the Computer ID does not match the current activation you will receive a message saying “Activation Count Exceeded” even though technically it’s the same machine.

To resolve this issue you will need to contact your reseller’s licensing support to have them deactivate the old Computer ID so that the new one will be activated.  But it’s best to avoid the problem completely by always working on the physical computer when making any changes to your SNL server installation so to minimize the risk of having your license server offline and users unable to use SolidWorks until it’s resolved.

Making major hardware or operating system changes to the computer where the SNL server is installed will also result in a change to the Computer ID.  Therefore before making any such changes to the computer, you should transfer the license back to the SolidWorks activation server through the SNL Administrator which frees up the activation for the new Computer ID.

By being aware of the above issues and situations, the possibility of license server downtime is reduced significantly during an upgrade.


The Last Step to Update the SolidNetWork License Server

$
0
0

When updating SolidWorks that has been installed using a floating, network license the latest version, many users will forget the very last step, re-activating the SolidNetwork License Manager.

This needs to be done  so that the SolidNetWork License Manager can communicate with the SolidWorks Activation Center and be allowed to provide the new, updated licenses to the SolidWorks users who are connected using the network licensing system.

If the step is missed, for instance when updating to SolidWorks 2012, any client computers still using SolidWorks 2011 would be able to get their licenses and open SolidWorks 2011, but as soon as a user tried to open SolidWorks 2012 they would receive the message “Could not obtain a license for SolidWorks”.

To reactivate the SolidNetWork License Manager:

1.  Open the SolidNetWork License Manager on the computer acting as the license server.

2.  On the “Server Administration” tab click the “Modify…” button.

3.  In the “SolidWorks Product Activation” dialogue window, select “Activate/Reactivate a software license”

4.  Click “Next >” and then follow the rest of the on screen instructions to complete the reactivation procedure.

Once complete, all users will be able to access the latest SolidWorks network licenses.


Where is the Update for the SolidNetwork License Manager???

$
0
0

If you recently updated your SolidWorks to a newer version and use network licensing, you also need to update the License Manager otherwise will you receive a “License server does not support this feature” error when you launch SolidWorks at the client.

The same installation media that was used to install SolidWorks can be used to update the License Manager. On the Welcome page of the Installation Manager, under Server Products, select Install SolidNetWork License Manager.

SolidWorks Installation Manager

SolidWorks Installation Manager

Blocking License Borrowing from the SolidNetWork License (SNL) Manager

$
0
0

The SolidNetWork License (SNL) Manager can distribute licenses to client installations that are directly connected to it through a network, but it can also allow client installations to borrow a license for a period of time and disconnect from the network.  The ability to borrow licenses from the license pool may not always be desired however, so how can this feature of the SNL Manager be disabled?


There is no direct way to disable this feature through the SNL Manager, however it can be controlled by use of an Options file.

For more information about setting up an Options file for the SolidNetWork License see the article Changing 2010 SolidNetwork License Manager Default Timeout Period

The option BORROW_LOWWATER can be used to prevent all users from being able to borrowing a license of a specified product from the SolidWorks network licnese.

This can be entered as:  BORROW_LOWWATER feature  n

The value feature should be replaced with the name of the SolidWorks product.  The value n should be replaced with 0 to block all borrowing.

The option EXCLUDE_BORROW can be used to prevent a specified user or group from borrowing a license.

This can be entered as:  EXCLUDE_BORROW feature type name

The value feature should be replaced with the name of the SolidWorks product, the value type should be either USER or GROUP and the value name is the group or user name that should be blocked from borrowing.

Borrowing and Returning your Network Licenses

$
0
0

So you’re getting tired of being in the office and tethered to your network?  Well that’s no problem.  You can easily borrow a license of SolidWorks from the network and use it on a laptop outside of your network.  Freedom. Here are the ins and outs of the borrowing licenses.

First off, you need to be connected to your network that has the SolidWorks licenses.  Then you can open the SolidNetwork License Manager on the client laptop.  This can be found under Start > All Programs > SolidWorks (year) > SolidWorks Tools > SolidNetwork License Manager.  There should be 4 tabs at the top.  Select “License Borrowing”.

License Borrowing

License Borrowing

Available Product Licenses:

In this scenario, we have five licenses of SolidWorks Premium available.  In SolidWorks 2010 and earlier, you would need to first borrow a SolidWorks Standard license before you could borrow a Premium license.   Starting with SolidWorks 2011, borrowing a Professional or Premium license will automatically borrow the prerequisite Standard license.

Borrow until:

Select the last day you will need the license.  Licenses are limited to a 30-day maximum borrow period.  This maximum period can be shortened using an Options file.  SolidWorks will be available for use through to 11:59pm on the day specified.  At midnight of the following day, the license will expire on the client laptop and the license will be freed up on the server.

Borrow/Return:

Once you have selected a product and the borrow until date, click Borrow.  This will show the license under the Borrowed Product Licenses window.  You will see that a Standard License was automatically borrowed.  Any borrowed licenses will not be available in the network pool until it is returned.

Borrow/Return Licenses

Borrow/Return Licenses

If you get back to the office before the date specified, you can manually return the license.  Ensure that you are connected to the network using the same method that was used to borrow the license (ethernet cable or wireless connection).  Then select the license in the Borrowed Product Licenses list and click Return.  The license will be returned and become available to the network pool.

Just purchased NEW SOLIDWORKS licenses? Don’t forget to Reactivate your License Manager

$
0
0

If you have purchased additional SOLIDWORKS licenses to float on your existing network and received a notice from our office indicating they’ve been processed, then you have ONE CRUCIAL STEP left to perform before your users will be able to utilize these new licenses – REACTIVATE YOUR LICENSE MANAGER.

Steps to reactivate your SNL license manager

Steps to reactivate your SNL license manager

While it only takes a couple of minutes to do, it is readily forgotten about. The image above outlines the process to complete the reactivation.

The post Just purchased NEW SOLIDWORKS licenses? Don’t forget to Reactivate your License Manager appeared first on SolidWorks Tech Tips, Videos & Tutorials from Javelin.


Missing the 5th tab in SolidNetWork License Manager

$
0
0

For much of the functionality of managing the license server, you need to go into the Server Administration tab of the SolidNetWork License (SNL) Manager. This can normally be accessed by going into the license server and going to Start > All Programs > SolidWorks 2015 > SolidWorks Tools > SolidNetWork License Manager 2015 (your version of SolidWorks may vary).

Server Administration tab on the 5-Tab SNL Manager

Server Administration tab on the 5-Tab SNL Manager


However, if you are using a computer as both a server and a client machine, you may be met with an unexpected surprise: a missing tab!

The 4-Tab SNL Manager for Client Machines

The 4-Tab SNL Manager for Client Machines


The 4-Tab SNL Manager is for client machines. It allows you to see who is using licenses, change the server, borrow a license, and choose which licenses you would prefer to use. The filepath for the 4-Tab SNL Manager is as follows:

C:\Program Files\SolidWorks Corp\SolidWorks\setup\i386\swlmwiz.exe


The 5-Tab SNL Manager is stored in a completely different location:

C:\Program Files (x86)\SolidWorks Corp\SolidNetWork License Manager\utils\swlmwiz.exe


Your folder structure may vary depending on your installation filepath. The important difference is that the 5-Tab version is found under the Program Files (x86) folder and the 4-tab one is under the Program Files folder. You can search those folders for swlmwiz.exe if you’re unable to find it.

The post Missing the 5th tab in SolidNetWork License Manager appeared first on SolidWorks Tech Tips, Videos & Tutorials from Javelin.

Why the Server Administration tab is not shown when launching the SolidNetWork License (SNL) Manager?

$
0
0

If one of your client machines serves as your server for SOLIDWORKS too, you may notice that you don’t have access to the Administration tab of the SNL Manager.

This behavior occurs when SOLIDWORKS has been installed on the SNL server, after the SNL Manager has been installed.

On the other hand, if you install the SNL Manager after installing SOLIDWORKS, you do not have access to the client SNL Manager and you cannot setup the server on your machine.

Server SNL Manager

Server SNL Manager

Client SNL Manager

Client SNL Manager

The reason is that SOLIDWORKS installs a client-side SNL Manager and the SNL Manager installs a server-side SNL Manager. Both versions share a common executable, and therefore a common Start Menu shortcut.

If you install SOLIDWORKS after the SNL Manager, on the SNL server, the client-side SNL Manager shortcut will overwrite the server-side shortcut. To resolve this, browse to the SNL Manager’s installation folder and create a new shortcut from its executable, “swlmwiz.exe”. The default location for the server-side SNL Manager executable is:

C:\Program Files (x86)\SolidWorks Corp\SolidNetWork License Manager\utils

But, if you have installed SNL Manager after SOLIDWORKS, you need to create a shortcut of the client side of the SNL Manager. The default location for the client-side SNL Manager executable is:

C:\Program Files\SolidWorks Corp\SOLIDWORKS\setup\i386\swlmwiz”

The post Why the Server Administration tab is not shown when launching the SolidNetWork License (SNL) Manager? appeared first on SolidWorks Tech Tips, Videos & Tutorials from Javelin.

Using the SolidNetwork License Manager Options File with Enterprise PDM [VIDEO]

$
0
0

Starting with SOLIDWORKS Enterprise PDM 2015 a change has been made in how the EPDM product licensing is being handled.  The SolidNetwork License Manager is now used to manage EPDM licenses instead of a license file.  This has many benefits for EPDM administrators, one of which is that it will allow much more customized control over EPDM licenses using the SNL Manager Options File.

One such benefit is when it comes to forcing inactive users to log off automatically so that their licenses are released back to the license pool, allowing other users access to EPDM.

Previously this functionality could be enabled in the Licensing node of the EPDM Administration console by going to “Automatic Log Off”. However the only option was to have users automatically log off after 30 minutes of inactivity.

Automatic Log Off

Automatic Log Off

With EPDM 2015 this functionality will be controlled by the SolidNetwork License Manager’s time out settings.

This means that by default the automatic log off, or time out, is ENABLED when you upgrade to EPDM 2015.  The default setting is for inactive licenses to be logged off after 2 hours, however this can be modified using the SNL Manager Options File.

How to create a Custom Options File

Step 1:  Launch the SOLIDWORKS SolidNetWork License Manager program and click “Modify…” on the Server Administration tab.

SolidNetWork License Manager - Modify

SolidNetWork License Manager – Modify

Step 2:  Select the option to “Activate/Reactivate a software license” and then click “Next >”.

Activate/Reactivate a License

Activate/Reactivate a License

Step 3:  On the next screen check the box beside “Options File” and click “Edit”.

Edit Options File

Edit Options File

Step 4:  If you do not have an Options File created yet you will be presented with the option to create a new one in the default path.

Create Options File

Create Options File

Step 5:  Now we write our Options File.  The correct syntax is to have the Option Keyword, followed by a space, then the Feature Name, followed by another space and then the Time in seconds.  For instance if we wanted the CAD Editor licenses to time out after 1 hour of inactivity but the Contributor license to time out after only half an hour we would write:

TIMEOUT swepdm_cadeditorandweb 3600
TIMEOUT swepdm_contributorandweb 1800

Write Options File

Write Options File

A full list of the Option Keywords that can be used in the SNL License file can be found on page 141 and 142 of the FLEXlm End Users Guide (http://files.solidworks.com/Supportfiles/FlexLM_Enduser/licensingenduserguide.pdf).

The Feature Names of the SOLIDWORKS Enterprise PDM products are as follows:

Product Name Feature Name
CAD Editor swepdm_cadeditorandweb
Contributor swepdm_contributorandweb
Viewer swepdm_viewer
PSL swepdm_processor


Step 6:  Once the Options File text is finished, save the sw_d.opt file and close it.

Save SolidNetwork License Manager Options File

Save SolidNetwork License Manager Options File

Step 7:  Ensure that all server information is correct and click Next to proceed to the next screen.

Check Server Information

Check Server Information

Step 8:  Click “Select All” to make sure all your SOLIDWORKS products are selected for reactivation, enter your contact email and click “Next>” to complete the reactivation process.

Activate License

Activate License

Activation Success

Activation Success

Here is a video demonstration of the steps outlined above:

The post Using the SolidNetwork License Manager Options File with Enterprise PDM [VIDEO] appeared first on SolidWorks Tech Tips, Videos & Tutorials from Javelin.

Adding EPDM License[s] to an existing SolidNetWork License Manager [VIDEO]

$
0
0

Starting with the 2015 release SOLIDWORKS Enterprise PDM now uses the SolidNetWork License Manager program instead of a license file.

If you already are using the SolidNetWork License Manager program for your SOLIDWORKS license[s] you may wish to simply add the EPDM license[s] to the existing license server instead of installing a second instance of the program.

Add Enterprise PDM licenses to an existing SolidNetWork License Manager

These are the steps to add your Enterprise PDM licenses to an existing SolidNetWork License Manager:

Step 1:  Make sure the SolidNetWork License Manager software release year matches the EPDM software release. (ie. EPDM 2015 will require the 2015 SNL Manager).  The SOLIDWORKS client installations do not necessarily need to be upgraded, EPDM 2015 and the 2015 SNL Manager are both compatible with older versions of SOLIDWORKS.

SolidNetWork License Manager software release

SolidNetWork License Manager software release

Step 2:  Go to the Windows Control Panel > Programs and Features then select the SolidNetWork License Manager and click Change.  In the installation manager window select the option to “Modify” the installation then click Next.

Modify Installation

Modify Installation

Step 3:  Click “Install“, then on the License Information screen, add a comma to separate the two serial number then the full 24 digit EPDM serial number.  (If you do not have your full 24 digit EPDM serial number you can retrieve it from the My Products section of your SOLIDWORKS Customer Portal Account).

Begin Installation

Begin Installation

License Information

License Information

Step 4:  Once the installation is modified you will need to reactivate the SolidNetWork License Manager to complete the licensing process.  Launch the SNL Manager program, then on the Server Administration tab click the “Modify” button.

Modify License Information

Modify License Information

Step 5:  Select the option to “Activate/Reactivate a software license“.  Click “Next“.

Activate/Reactivate a software license

Activate/Reactivate a software license

Step 6:  Make sure all products are selected and click “Next” to complete the activation.

Select All Products

Select All Products

Here is a video demonstration of the procedure described above:

The post Adding EPDM License[s] to an existing SolidNetWork License Manager [VIDEO] appeared first on SolidWorks Tech Tips, Videos & Tutorials from Javelin.

How to Perform a Telnet Test [VIDEO]

$
0
0

When troubleshooting connectivity issues for some SOLIDWORKS products, such as the SolidNetwork License Manager, SOLIDWORKS Workgroup PDM or SOLIDWORKS Enterprise PDM, it’s possible that a ping test may succeed but the communication may still be failing.

A Telnet Test can be very useful in such situations to determine if the issue still is a network communication issue or if it’s an issue with the particular software.  The Telnet Test allows you to ensure that a specific port on the target system is open and responding.

Set Up the Telnet Test

To perform a Telnet Test, the Telnet Client needs to be turned on by going to the Control Panel > Programs > Turn Windows features on or off, or by going to Programs and Features and clicking Turn Windows features on or off from there.  In the list of Windows Features, check the box beside Telnet Client to enable the feature.

Add remove programs

Add remove programs

The Telnet Client will take a few minutes to turn on.

Windows Features Update

Windows Features Update

Perform the Telnet Test

To perform the actual test, launch the Cmd prompt and type in the command telnet, followed by a space then the target computer name, followed by another space and then the port number.  This should look like: telnet host_name port_number.  Press Enter to perform the telnet.  If the telnet succeeds the prompt will display a flashing cursor, if it fails it will report that it cannot open the connection.  The most common reason for a failed Telnet Test is if the Firewall settings are blocking the port.

Cmd Window

Cmd Window

Successful Connection

Successful Connection

Failed Connection

Failed Connection

Common communication ports for SOLIDWORKS products:

SolidNetWork License Manager
TCP port 25734 and 25735

SOLIDWORKS Workgroup PDM
Request:  TCP port 40000
Data:  TCP port 30000
VaultAdmin:  TCP port 20000
Viewer:  TCP port 80

SOLIDWORKS Enterprise PDM
Archive Server:  TCP and UDP port 3030
SQL Server:  TCP port 1433 and UDP port 1434
Web Server:  HTTP port 80 and HTTPS port 443

Video Demonstration

Watch the video below or visit our YouTube Channel: https://youtu.be/sI9S-ItQuoc

The post How to Perform a Telnet Test [VIDEO] appeared first on SolidWorks Tech Tips, Videos & Tutorials from Javelin.

SolidNetWork License (SNL) Manager Troubleshooting

$
0
0

SolidNetWork License (SNL) Manager Troubleshooting

When you are SolidNetWork License (SNL) Manager Troubleshooting there are a few steps that you have to take in order to investigate the problem. In this post I have outlined the steps in the recommended order, starting with the Server and then the Client:

Server side

You have to make sure that your version of SNL Manager on the server is the same as the latest version of SOLIDWORKS you have installed on your client machines. So if SOLIDWORKS 2012, 2014, and 2015 is installed on the client machines, then you have to install SNL Manager 2015 on your server.

Is there a Firewall on your server?

If you have firewall on your server you need to check ‘A firewall is in use on this server’ option in the SNL Manager is checked off. To do that you need to follow these steps:

  1. Start SolidNetWork License Manager (Start > Programs > SOLIDWORKS version > SolidNetWork License Manager > SolidNetWork License Manager).
  2. On the Server Administration tab, under License Server, click Stop. (Click Yes when prompted for confirmation and OK to complete stopping the license server.)
  3. Under License Information, click Modify.
  4. Under Server Type, select the server arrangement for your network (Single or Triad) and then click Next.
  5. Under Server Information: Select “A firewall is in use on this server

Then you will need to add the exceptions rules to your firewall (on your server and client machines) to let the server and client machines be able to communicate with each other. You also need to add the lmgrd.exe and sw_d.exe programs to the firewall exception list to prevent firewall from interfering with these programs. They are stored in the SNL Manager installation folder.

Below are the steps to open the required ports in the firewall, for the most popular operating systems:

Microsoft Windows Server 2008:
  1. Select Start > Control Panel > Security and System  > Windows Firewall
  2. In the left pane, select “Advance settings” link
  3. Select the “Inbound Rules” and right-click to choose “New Rule
  4. Select “Port” and click on the “Next” button
  5. Make sure “TCP” is selected, type in port 25734 for the “Specific local port” field and click on the “Next” button
  6. Select “Allow the connection” (which should be the default selection) and click on the “Next” button
  7. Select the desired Profile to apply the exception (select all the profiles if unsure)
  8. Enter a name for the rule and click on the “Finish” button
  9. Repeat Steps 3 through 8 for Ports 25735.
Microsoft Windows 7:
  1. Launch the Control Panel
  2. Select System and Security
  3. Click on the Windows Firewall link
  4. Click on the Advanced Settings link in the right pane
  5. Click on the Inbound Rules and select New Rule
  6. Select Port and click on Next
  7. Type in the port 25734, 25735 in the Specified remote port field, choose TCP, and then Next
  8. Click on the Allow the Connection option and select the desired profiles
  9. Click next and type in the name for the rule.
  10. Next reactivate your license as explained in this blog post

Has the SNL Manager started & are licenses available?

Before moving to the client machines make sure that the SNL Manager is started, and check the “License Usage” tab to make sure there are available licenses. After all if the SNL Manager can’t see the licenses there is nothing available to distribute to the client machines.

Client Side

On the client side click Start > Programs > SOLIDWORKS [year] > SOLIDWORKS Tools > SolidNetwork License Administrator.

Are licenses available?

Check the “License Usage” tab there to see if SOLIDWORKS acknowledges the fact there are free licenses.

If there are no free licenses first go to Server List tab and make sure that the name of the server and port number is entered right. The format should be 25734@server_name

If the name and port number is right check the TCP/IP connectivity between the client and server. There are two tests that must be run to verify this.

  • First, open a command prompt by going to Start>All Programs>Accessories>Command Prompt and perform the following:
    • Type “ping <server_name>” without quotes (example: ping Machine24). The IP address can be substituted for the server name if necessary.
    • A message must be received informing that the ping is successful (Read the ping statistics; Packets: Sent = 4, Received = 4, Lost = 0 (0%)).
  • Next test you need to perform is the Telnet test. To perform a Telnet Test, the Telnet Client needs to be turned on. Learn how to perform a Telnet test.

Both of these tests must pass. If either one or both fail, then there is no sufficient TCP/IP connectivity between the client and the server for the SolidNetWork License Environment to function correctly.

Is the registry key correct?

If both of the tests pass and you are still having problems checking out the license from the server, the next step is to review the license manager registry key to make sure the server name is entered correctly:

  1. From the Windows Start menu, select Run and type regedit:
  2. In the Registry Editor find these keys:
    HKEY_LOCAL_MACHINE\SOFTWARE\FLEXlm License Manager
    HKEY_LOCAL_MACHINE\SOFTWARE\Wow6432Node\FLEXlm License Manager
  3. Double-click on the string SW_D_LICENSE_FILE and make sure the server name is right. Otherwise, overwrite the server name (25734@server_name).

Still having problems?

At this point if you still have a problem obtaining a license you will need to contact your SOLIDWORKS VAR Support for help.

The post SolidNetWork License (SNL) Manager Troubleshooting appeared first on SOLIDWORKS Tech Tips, Videos & Tutorials from Javelin.

SOLIDWORKS PDM Standard

$
0
0
SOLIDWORKS PDM Standard

SOLIDWORKS PDM Standard

SOLIDWORKS PDM Standard is the new document management tool that is being released with SOLIDWORKS 2016, it works in a similar manner to SOLIDWORKS Enterprise PDM, which has been renamed to SOLIDWORKS PDM Professional for the 2016 release.

SOLIDWORKS PDM Standard replaces SOLIDWORKS Workgroup PDM, which is set to be discontinued in the 2018 release. SOLIDWORKS PDM Standard is included with SOLIDWORKS 2016 Professional and Premium licenses.

PDM Standard is the ideal data management application for single-site SOLIDWORKS businesses that need an easy-to-use solution that can be easily upgraded to SOLIDWORKS PDM Professional when their needs change. PDM Standard includes many of the high-powered features of SOLIDWORKS PDM Professional, such as electronic workflow, built-in notification system, and Windows Explorer integrated search.

PDM Standard Client types

There are three client types available:

  • CAD Editor, allows interaction from within SOLIDWORKS. This includes viewing, adding and modifying files.
  • Contributor, allows interaction through a Windows Explorer window. This includes viewing, adding and modifying files.
  • Viewer is similar to the Contributor, but only viewing is allowed.

Additional licenses of the Contributor and Viewer, can be purchased in 5-packs.

SOLIDWORKS PDM Standard licenses

Licenses will be handled by a SolidNetWork License (SNL) Manager. This is the same utility that SOLIDWORKS network licenses use. A CAD Editor license will be available for each seat of SOLIDWORKS 2016 Professional and Premium license owned. A serial number will be assigned to each eligible SOLIDWORKS 2016 license. The serial numbers can be accessed from the SOLIDWORKS Customer Portal, and if you can’t find them your SOLIDWORKS Reseller can help you.

The PDM Standard serial numbers are set to be released in early November.

To Learn More


The post SOLIDWORKS PDM Standard appeared first on SOLIDWORKS Tech Tips, Videos & Tutorials from Javelin.


SolidNetWork License Manager Manual Activation

$
0
0

On some occasions when your server is not connected to the internet (temporarily or permanently) you have to execute a SolidNetWork License Manager manual activation. There are a few steps involved in order to properly activate the SNL manager:

1. Start the SNL Manager through Start > Programs > SOLIDWORKS version > SolidNetWork License Manager > SolidNetWork License Manager

2. Select the Server Administration tab

3. Select Modify

SolidNetWork License Manager Manual Activation

Modify License Information

4. You will get a screen where you need to select the product you want to activate, and the activation method. Select the Manually via email  option

Select Manually via e-mail

Select Manually via e-mail

5. Select Save to receive the request file. You may need a USB drive to save the file on it and move it to another computer with internet access

Press Save to create a request file

Press Save to create a request file

6. Email the saved file to activation@solidworks.com.

7. SOLIDWORKS Activation will email you back a configure file. Save this file on the USB drive again and move it back to your server as you will need it to load into the activation manager

8. Select Modify in the Server Administration tab

9. Select Open and browse to the configure file that you just received from Solidworks Activation

Open the activation file

Open the activation file

10. You will receive a message window stating the activation was successful

SOLIDWORKS Product Activation Message

SOLIDWORKS Product Activation Message

As explained in the steps above if this is the first time you are activating SNL Manager you need to go through this process one more time.

  1. Select Save to receive the second request file
  2. Email the second saved file to activation@solidworks.com
  3. Once the second file is received, repeat the same open process as outlined above. Modify > Manually via email > Open and select the second file to load

Your SOLIDWORKS product should now be activated.

The post SolidNetWork License Manager Manual Activation appeared first on SOLIDWORKS Tech Tips, Videos & Tutorials from Javelin.

How to change the SolidNetWork License Manager Communication Port [VIDEO]

$
0
0

The default ports used by the SolidNetWork License Manager are 25734 and 25735.

In some cases though these ports may already be in use.  If that is the case, the port used by the SNL Manager can be changed easily through the activation options.

Change the SolidNetWork License Manager Communication Port

Step 1:  Launch the SolidNetwork License Manager and on the Server Administration tab, click the Modify button.

change the SolidNetWork License Manager Communication Port

1 – Select Modify

Step 2:  Select Activate/Reactivate a software license and click Next >

2 - Activate-Reactivate

2 – Activate-Reactivate

Step 3:  To control both ports, ensure that the option A firewall is in use on this server is checked.

3 - Firewall

3 – Firewall

Step 4:  The default port numbers can be modified by entering in the new port numbers in the text fields on the Server Information page.  Once the new port numbers are entered click Cancel.  The SNL Manager will now begin communicating across the ports specified.

4 - New Ports Assigned

4 – New Ports Assigned

Video Demonstration

Here is a video demonstrating the steps:

The post How to change the SolidNetWork License Manager Communication Port [VIDEO] appeared first on SOLIDWORKS Tech Tips, Videos & Tutorials from Javelin.

How to Manually Activate a SOLIDWORKS Network License [VIDEO]

$
0
0

If the server running the SolidNetWork License Manager is not connected to the internet then the software can be activated manually through email.

Here are the steps to activate a SOLIDWORKS Network License manually using e-mail:

Step 1:  Launch the SolidNetwork License Manager and on the Server Administration tab, click the Modify button.

Activate a SOLIDWORKS Network License

1 – Select Modify

Step 2:  Select Activate/Reactivate a software license and click Next >

2 - Activate/Reactivate

2 – Activate/Reactivate

Step 3:  If a firewall is in place make sure that the option is checked and the proper port numbers are entered in, then click Next >.

3 - Firewall

3 – Firewall

Step 4:  Select the option to activate Manually via e-mail, then click Next >.

4 - Manual

4 – Manual

Step 5:  On the Manual Activation screen, click on the Save… button.

5- Save Activation Settings

5- Save Activation Settings

Step 6:  Save out the activation request txt file and transfer the file to a system with an internet connection.

6 - Save Activation File

6 – Save Activation File

Step 7:  Email the file to activation@solidworks.com.  Leave the subject field and email body blank to avoid any delays in receiving the activation response.

7 - E-mail Activation File

7 – E-mail Activation File

Step 8:  The activation response email should be received within a few minutes of the activation request being sent.  Transfer the response .txt file to the server computer.

8 - Returned File

8 – Returned File

Step 9:  On the Manual Activation screen, click Open… and select the activation response file then click Open.

9 - Open License File

9 – Open License File

Step 10:  Once the activation successfully completes click “Finish”.  If the activation does not complete successfully, contact your SOLIDWORKS VAR for further assistance.

10 - Activation Success

10 – Activation Success

Video Demonstration

Here is video for the steps described above

The post How to Manually Activate a SOLIDWORKS Network License [VIDEO] appeared first on SOLIDWORKS Tech Tips, Videos & Tutorials from Javelin.

Setting Up a SOLIDWORKS PDM Test Environment for a New Major Release

$
0
0

When there is a new release of SOLIDWORKS PDM, it is wise to first test the upgrade procedure so that you can identify and address any problems, before updating your production vault.

SOLIDWORKS PDM uses the SolidNetWork License Manager (SNL) and this needs to first be updated to the same version of SOLIDWORKS PDM that is to be installed. The License Manager is installed from the SOLIDWORKS Installation Manager.

SOLIDWORKS PDM Test Environment

SOLIDWORKS License Manager

A newer version of the SolidNetwork License Manager can used with older versions of SOLIDWORKS PDM and SOLIDWORKS, therefore a separate installation of the License Manager is NOT required.

Create a SOLIDWORKS PDM Test Environment

Once the License Manager is updated, the new version of SOLIDWORKS PDM can be installed. You will require a different system to install the new version of SOLIDWORKS PDM. This can be a different server, a PC used for testing, or a virtual machine. If you are going to be using a virtual machine, please ensure that the virtual environment you are using is supported. The same SQL installation you use for your production vault can be used for your test vault, so SQL does not need to be installed on your test environment.

Using a Sandbox Vault

Once SOLIDWORKS PDM has been installed on your test system, you can now import the contents of your production vault into your sandbox vault. The steps to do this, can be found in my blog article SOLIDWORKS PDM – Sandbox Vault.  This process will copy your vault setting, but not the the archive or database. If you also like to copy these items to your sandbox vault, please contact your SOLIDWORKS Reseller, or stay tuned to the Javelin blog. The imported archives must be of the same version, as the archive server. To update the imported archives, please run the Upgrade utility. This utility can be found in the installation file set under the sub-folder swpdmserver\Upgrade.

Learn More

Javelin provides PDM training in-class or live online. Check out the training courses available.

The post Setting Up a SOLIDWORKS PDM Test Environment for a New Major Release appeared first on SOLIDWORKS Tech Tips, Videos & Tutorials from Javelin.

SOLIDWORKS SolidNetWork License Manager Options File provides additional control

$
0
0

The SolidNetWork License Manager runs on FlexNet technology and there is a PDF guide included in the installation with additional details on how you can further control the license usage.  Through the use of an Options file in the License Manager, you can control timeout periods, restrict user access, set the number of available borrowed licenses and more.

SOLIDWORKS SolidNetWork License Manager Options File

SNL Options File

You can find the FlexNet PDF guide on the server with the installed License Manager.  Go to C:\Program Files (x86)\SolidNetwork License Manager\Docs\flexuser.  Within the ‘licensingenduserguide.PDF’, view the section ’13. Managing the Options File’.  There is a table with all of the available Options File Syntax.

We have past blog posts illustrating how to setup the Options file for use with the Timeout and Reserve keywords.

More useful keywords

However the PDF guide above shows more keywords for the SolidNetWork License Manager Options File that could be used.  Here are a few that may be of interest:

  • BORROW_LOWWATER
    • set a specific number of licenses that cannot be borrowed so they are only available when connected to the network
    • i.e. “BORROW_LOWWATER SOLIDWORKS 2” will always keep 2 licenses on the server that cannot be borrowed
    • NOTE: this does not update the Free license count in the borrow tab, so it will fail to borrow a license even if the borrow tab shows 2 free licenses
  • INCLUDE_BORROW or EXCLUDE_BORROW
    • specific users who can and cannot borrow a license
  • MAX_BORROW_HOURS
    • the default maximum time that a license can be borrowed is 30 days
    • while you cannot make it more than 30 days, the MAX_BORROW_HOURS allows you to shorten the time allowed to borrow
  • EXCLUDE or INCLUDE
    • specific users who can or cannot access specific features (i.e. Simulation)
  • LINGER
    • extends the amount of time a license is held on a computer after closing SOLIDWORKS so they will still have the license for the next session
    • NOTE: be careful as this will tie up licenses for an extended period of time after a user is done with it

The post SOLIDWORKS SolidNetWork License Manager Options File provides additional control appeared first on SOLIDWORKS Tech Tips, Videos & Tutorials from Javelin.

Viewing all 58 articles
Browse latest View live